Wednesday, February 29, 2012

PURIM'S TRI-PERFECTA

 Okay children, today’s lesson is: Hanukkah has its latkes, Passover has its macaroons, and Purim has its hamantashen. The significance of these three-cornered cookie dough pastries varies--some say they resemble the hat the villain of the story, Haman, wore. And some say they represent the three-cornered pockets of his coat. Regardless, no one can celebrate Purim without them. And the celebration, which is akin to a raucous carnival, complete with costumes, grating noisemakers, and lots of wine, is key to this Jewish holiday about good triumphing over evil--what else?
Giving to charity is a holiday custom, as is exchanging platters of baked goods, treats or fruits with friends and family. It is not a stretch to assume that hamantashen will be found on every sweets platter, and there are as many recipes for the pastry as there are platters exchanged throughout the world. I do have a favorite of my own. It is very simple, and best of all, very tasty. My way of tweaking this holiday treat is by changing up the fillings, which are most  commonly prune jam and poppy seed paste. Fruity preserves, having the texture of a tapenade (But please, do NOT substitute actual tapenade!), are best as they are sticky and thick enough not to ooze out of the sides during baking which can result in disasterI favor using dried fruits, such as the figs in the first recipe that have been simmered in a vanilla syrup. This filling is reminiscent of the filling often found in “cuccidati,” an Italian pastry. The second filling contains cherries and cinnamon, and is studded with bits of toasted walnuts.
HAMANTASHEN

1c. vegetable oil
1 1/4c. sugar
1/4c. orange juice
1 1/2 tsp. vanilla extract
3 eggs
4 1/2c. all-purpose flour
2 1/2 heaping tsp. baking powder
1/2 tsp. salt
1 egg yolk + 1 Tbsp. water (for brushing the tops)
coarse sugar (optional)

In a large mixing bowl, whisk together sugar and oil. Mix in orange juice, vanilla extract, and eggs. Fold in baking powder and salt. (Dough will be sticky but firm.)
Cover dough with plastic wrap and refrigerate for at least one hour.
Preheat oven to 350 degrees. Line two baking sheets with parchment paper.
Roll out dough on a lightly floured surface to a thickness of about 1/8 inch. 
Cut into 3-inch circles using the top of a drinking glass.
Place a generous teaspoon of filling in the center of each circle.
Fold up three sides of each circle and bring them together to form a triangle.
Brush pastries with egg yolk/water mixture and sprinkle with a dusting of coarse sugar, if desired.
Bake until lightly golden, approximately 18-25 minutes.
Makes about 4 dozen pastries, depending upon size.

Fig Filling
(makes 2 cups)


1c. finely chopped dried figs
1 1/2c. water
1c. apple juice
1/4c. sugar
1 tsp. finely grated orange zest
1 whole vanilla bean, split and scraped of seeds


Combine all ingredients except the orange zest in a medium saucepan and bring to a boil. Reduce heat to a simmer and cook for an hour, until figs are soft. Remove vanilla bean and transfer remaining ingredients and orange zest to the work bowl of a food processor. Process until mixture is combined, but not totally smooth.


Dried Cherry Filling
(makes 2 1/2 cups)


1/4c. water
zest of one orange, finely grated
2/3c. orange juice
1Tbsp. fresh lemon juice
1/3c. brown sugar, packed
1/4 tsp. almond extract
1/2 Tbsp. cinnamon
2c. dried sour cherries
1c. golden raisins
1/2c. walnuts, lightly toasted and finely chopped

Place 1/4 cup water in a medium saucepan. Add the orange zest, orange and lemon juices, cinnamon, sugar, cherries and raisins. Cook, stirring, over low heat for 5 to 10 minutes to soften the fruit. If the fruit starts to stick to the saucepan, add a bit more water. Remove from the heat, let cool for about 5 minutes, add the almond extract,  and place in a food processor.  Process until mixture is combined, but not totally smooth. If it is too thick, add a drop of water. Stir in nuts. The mixture can be used immediately, or it can be transferred to an airtight container and refrigerated for up to two weeks or frozen for up to six months.

Thursday, February 9, 2012

CAFFEINE RUSH

Once upon a time there was a little store on the corner of 52nd Street and Second Avenue called Bazaar de la Cuisine. Other than the fact that it sold Le Creuset cookware and some French porcelain dinnerware, the store really didn’t have anything to do with France. (Note: I am not a Francophile, so if the owners are out there somewhere, and they claim French heritage, mea culpa.) It was however, a veritable treasure trove of kitchen miscellania from all parts of the world.
Right about the time I left my two roommates and moved into my own cozy studio apartment, Bazaar de la Cuisine posted a sale sign on the French flag-festooned red, white, and blue sandwich board that stood outside the store. They were having a sale on coffee mills...a BIG sale. To make a long story short, I went in, bought a coffee mill, and it became my very first kitchen purchase ever.  I could have sprung for something a little fancier--the coffee grinder is quite a utilitarian piece of kitchen equipment--but it was inexpensive enough, and I had a wealth of other culinary “stuff” that was handed down to me. I wasn’t even a huge coffee drinker back then--it was way before the Starbucks-on-every-corner days. But the idea of having a nice hot cup of freshly made coffee in my own place seemed so sophisticated and "mature" to me. And knowing that I ground my own beans further planted me (in my mind) into the world of young, urban turks--ready to climb the ladder of success, coffee mug in hand.
My next task as a young metropolite was to purchase the beans. Porto Rico  Coffee in Greenwich Village has been in existence since 1907, and I don’t think they’ve changed the look of the place since. They roast their own beans and after all those years, that rich, deep coffee smell seems to have permeated the walls. It hits you the moment you enter and puts you in a mocha spell. I knew that this was definitely where I wanted to buy my beans, and so I stood in line amongst all those other coffee aficianados like myself. And when I was asked what type of grind I would like, I proudly declared, “I’ll grind my own, thank you.”
Fast forward some thirty-odd years and many cups of coffee later. Bazaar de la Cuisine no longer exists, but I still buy my coffee from Porto Rico. Whenever I’m in Greenwich Village I always stop by and meander around all the burlap sacks from far-off places that are stuffed to the gills with beans in hues that range from light brown to almost black.  And I’m still grinding my beans in that little workhorse of a coffee grinder. Sometimes, and I know I shouldn’t admit this, I’ve even used it to grind spices (I always wipe it out after I do that) and chop vanilla beans and sugar (do not try this at home) when I make my Honey Vanilla Caramels. No, it’s not a burr grinder and it does not automatically feed the grounds into my coffeemaker, but it gets the job done. We’ve been together a long time, that mill and I, and relationships like that should not be tossed aside like an...old coffee grinder.
A great cup of coffee, in my humble opinion, needs a great cookie by its side. I discovered a new one just the other day, and was intrigued by the preparation. It’s not your average scoop and drop cookie. 1000 Layer Chocolate Chip Cookies, from The Newlywed Cookbook by Sarah Copeland, are thin, crisp, and with a sprinkling of sea salt on top, not too sweet. They stack up real nicely next to a steaming cup, and the taste stacks up pretty well too. The next time I make them I may sneak a dusting of crushed toffee in along with the chocolate shards. I can never leave well enough alone.
THOUSAND LAYER CHOCOLATE CHIP COOKIES
(adapted from Sarah Copeland)
(Makes 20 cookies - note: I rolled them out thinner, so my yield was a little higher)
1 cup/ 225 g unsalted butter, at room temperature
3/4 cup/150 g packed dark brown sugar
3/4 cup/150 g granulated sugar
4 egg yolks, at room temperature
1 tsp pure vanilla extract
2 1/4 cups/ 280 g all-purpose flour, plus more for dusting
3/4 tsp baking soda
3/4 tsp fine sea salt or table salt
9 oz/255 g high-quality bittersweet chocolate
1/4 tsp fleur de sel {optional}
1/4c. heavy cream, for brushing
Preheat the oven to 375˚. Line two baking sheets with parchment paper.
Cream butter and both sugars together with an electric mixer on medium-high speed until light and fluffy, about 3 minutes. Beat in egg yolks, two at a time, followed by vanilla.
Whisk together the flour, baking soda, and salt. Stir dry ingredients into butter mixture on low speed until just mixed. Stop and scrape down the bowl to make sure all the butter is evenly incorporated and give the dough a final mix.
Divide the dough into 3 portions. Put each dough portion on large piece of plastic wrap and pat into a 4-by-6-inch rectangle. Wrap and refrigerate on a flat shelf in the fridge until well chilled, about 30 minutes. {This helps to set the butter and make the dough easier to work with.) Meanwhile, coarsely chop the chocolate into thin shards using a serrated knife. Set aside.
When the dough is chilled, lay one portion on a lightly floured countertop. Sprinkle with half of the chocolate and top with another piece of dough. Repeat with remaining chocolate and dough until you have a slab of dough with two layers of chocolate. Dust lightly and evenly with flour and roll gently with a rolling pin into a large 9-by 6-inch rectangle that’s about 1 1/2 inches thick.
Using a 2-inch round cookie or biscuit cutter or a thin rimmed glass, cut out ten rounds of dough. Gather the scraps together, pat lightly, and cut out remaining cookies.
Divide half of the cookies between the 2 prepared baking sheets, leaving about 3 inches between cookies since they will spread. Brush the tops of each cookie with the cream, and with a light hand, sprinkle with a few grains of sea salt.
Bake until the cookies are set, 12 to 15 minutes, switching the sheets halfway through top to bottom if you’re baking two sheets at a time. Let cookies cool slightly, about 3 minutes, then transfer the cookies with a thin spatula to a wire rack to cool completely {or, just slide the parchment paper directly onto the cooling rack}. Let the baking sheets cool completely before using to bake the remaining dough. Bake as directed, switching sheets top to bottom half way through baking, and cool.
Store in an airtight container for up to 4 days.

Wednesday, February 1, 2012

LUNCH DATE

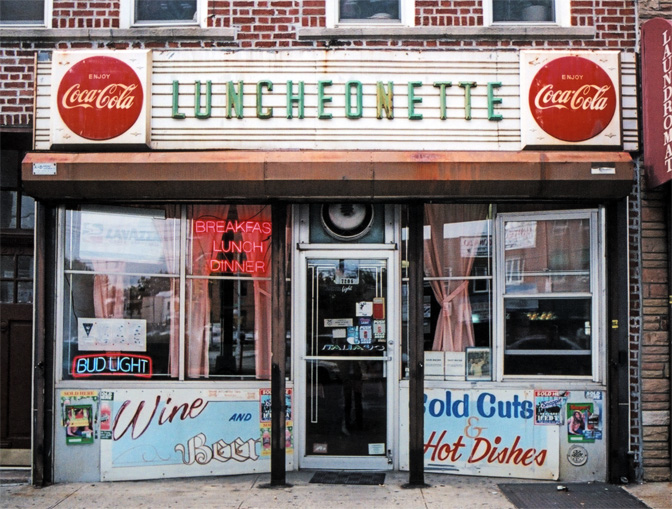
The Friday lunchtime special at the small diner (known as “The Luncheonette”) in my neighborhood was called The Junior. It consisted of a smaller than usual hamburger, a handful of crinkle-cut French fries, a small Coca-Cola (in a real glass), and a dill pickle spear (my favorite part). All this could be had for fifty cents, and it was what I ate every Friday during the fourth grade.

www.jamesandkarlamurray.com


I could often see my mom standing in front of The Luncheonette as I walked the last leg of my two-block hike from P.S. 135. Mom was a manicurist in the beauty salon a few doors down and to make sure we were on schedule, she would get there early and preorder my lunch. We always sat at the counter--on the round red leatherette stools that swiveled when you tried to hop up on them. She would never order her own meal--she didn’t have that much time to spend because Friday was one of the busiest days at the salon. As I ate she would often sneak a fry out of my plate. I liked it best when she kept me company. We would chat about school as I took small bites and tried to extend my lunchtime break for as long as I could. Every so often she would have to get back to work before I was done, and I was then left to finish and head out on my own.
From my spot at the counter, I could observe a flurry of activity--everyone there, workers and diners alike, was in a rush. I would often see one or two other elementary school students eating, but mostly the other stools and the chairs near the Formica-topped tables were being used by adults who were on their own lunch hours or just taking a midday break. The air at that hour hung thick, a mixture of the scent of frying meat from the grill and sugar from the few donuts (probably left over from breakfast) sitting uncovered on an oil-stained doily on the chrome cake stand.  Every once in a while a whirring could be heard from the malted machine, and then the click of a glass hitting the counter right before the thick, slow-to-pour liquid filled it to the brim. I loved sitting there, listening to the cacophony of sizzles and clanks intermingled with the snippets of conversation I could pick up.
 My meal was eaten pretty rapidly, but I saved the last few drops of the syrupy sweet, dark cola for last. We were not a soda family, and this drink was truly a treat. The entire meal, so simply American, was quite different from the same meal we ate at home.  My mom’s French fries were hand cut--they didn’t come frozen in a bag. They were deep-fried in clear, clean oil, and left to drain on a sheet of brown butcher paper that was stretched across a big bowl. Sprinkled with a shower of kosher salt, they were brown and crisp on the outside and creamy on the inside. And her hamburgers came from meat that was specially ground to order. They were nothing like the thin brown patties at The Luncheonette. If asked whether I preferred the burger and fries from home or The Junior, I know The Junior would have won hands down. It had nothing to do with the food and how it was prepared. It was the experience--the half hour with my mom sitting next to me in her black uniform with the butterfly applique on the shoulder. A weekly slice of Americana that I wouldn’t trade for any other meal.